| Of course, to properly utilize the calendar, you will need to be able to add entries to it. This is simply done by using the editing space provided on the daily calendar view (See
Previous
for information on that.). The following image is a diagram of the editor space to the right of the events listing.
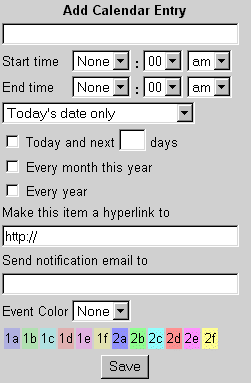 Open Webmail makes adding an entry quite detailed. There is no navigating to another page to add an entry. Instead you are given everything at a glance, all to make it easier for you. Although the following instructions may seem somewhat complicated, the calendar entry panel is quite self-explanatory and easy-to-use with a little help and experience. Open Webmail makes adding an entry quite detailed. There is no navigating to another page to add an entry. Instead you are given everything at a glance, all to make it easier for you. Although the following instructions may seem somewhat complicated, the calendar entry panel is quite self-explanatory and easy-to-use with a little help and experience.
To add an entry, type your memo in the text field under Add Calendar Entry. You then will need to select the time(s) at which the event will take place. Beside Start Time, select the hour, minutes, and the time of day it will take place (AM or PM -- Morning or Afternoon). You can also select the End Time of the event (follow the same instructions as the Start Time). If you select "None" for the Start Time, the event will be added to the bottom of the daily list, at no particular time. You can use this when, for example, you know the day or date of the event, but don't know the exact time. If you select no End Time, then the event will simply not state an end time.
You then have an option to specify how frequently in the current month that this event will take place. If the current day is the only day that the event is relevant to, leave the default selection in the drop menu ("Today's Date Only"). However, this event may take place every of the same day that is selected. The calendar will automatically recognize what day you are on, and adjust the drop menu accordingly. For example, if it is Thursday, your other two options will be "Every 1st Thursday of The Month", and "Every Thursday of this Month". These will adjust the events to the selections' obvious meanings.
If you want to be more specific, the Open Webmail calendar allows you to get into a lot more detail. Instead, you can check off "Today and the next ___ days" (Where "___" is a text field in which you can specify a number), and change the text field accordingly to however many days the event is in effect. For example if you had an event that took place at the same time from Monday through Thursday of a week, you would choose the Monday of which the event will take place on the monthly view, check off "Today and the...", and type "3" into the text field.
The other checkboxes ("Every Month of This Year" and "Every Year") allow you to put the event in effect for these frequencies. "Every Month of This Year" will duplicate the event to every month. As well, "Every Year" will duplication the event annually. These effects, as well as the "Today and the...", will only take place if they are checked off. And, because they are checkboxes, you can use them all simultaneously by checking off more than one checkbox.
A Hyperlink is a connection to a website or file that may help you remember more details about the event. This can be a link to a website, virtual file, or physical file on your machine. If it is a link to a file or page on the internet, leave the http:// prevalent in the text field. However, if it is link to a file on your computer, change it to file:///, and then the path the file (example: file:///c:/my documents/file.ext). Note that if you have created a link to a file on your local machine, it will be accessible from only that machine, and no others (unless, of course, that file happens to exist on another machine you may be working on). It is recommended to keep the http:// within the text field and make a link to an online website to ensure usability.
In the box under Send notification email to, you can type an e-mail address as a reminder to someone you may, for example, have a meeting with. Optionally, you could type your e-mail address instead, as a self reminder. When the event is scheduled to take place, an e-mail will automatically be sent to the address specified in this text box.
The Event Colour enables you to colour-code your events. This allows for a visual representation of your event schedule, whether colour-coded by times of day, types of events, or anything you wish to have the colour represent. To colourize your event entry, Select a number-letter combination from the drop-menu, that corresponds with the colour in the legend below.
Finally, after you are finished entering in the event data, click "Save" and it will be entered into the list of events for that day (and any others you may have specified in the event frequency).
You can also edit the events later after you have created them by clicking [Ed] by the corresponding event. You can follow the instructions above for editing events as they are relatively identical. The only thing you cannot change by editing is the frequency of the event. A quick workaround would be delete it by clicking [Del] by the corresponding event, then creating a new event with the same name and times, and then changing the frequency (monthly or annually). |